Skip to content
  • Park Slope
  • Culture
  • Motherhood
  • Travel
  • Food
  • Style
  • About
  • Park Slope
  • Culture
  • Motherhood
  • Happily K

  • Travel
  • Food
  • Style
  • About
Design

DIY Valentine’s Day Themed Bloglovin’ Piñata

February 13, 2015May 8, 2023 Kelley Leave a comment

pinata1

Last month, I accepted a part-time position on the Community Team at Bloglovin’. In a single, beautiful feed, Bloglovin’ enables users to follow blogs and read new posts and to discover new interesting blogs and content. It’s particularly popular among lifestyle and fashion blogs, but you can add any blog to your feed tailoring the content to your interests. You can follow sites like Mashable, TechCrunch, Levo League (career advice for millennials) and even Etsy’s News blog which publishes interesting information on the “maker” movement. Do you use it?

Once you sign up, you can start reading and discovering new posts immediately, and earlier this week, Bloglovin’ launched a new feature called Collections, which is a tool that allows you to “save” posts and organize them into collections. Throwing a party? Create a collection with entertaining tips and wine pairing guides. Planning a cross country road trip? Start mapping out your route with a collection of must-see destinations and the best places to stay at each stop. Sounds fun, right?

Bloglovin Pinata

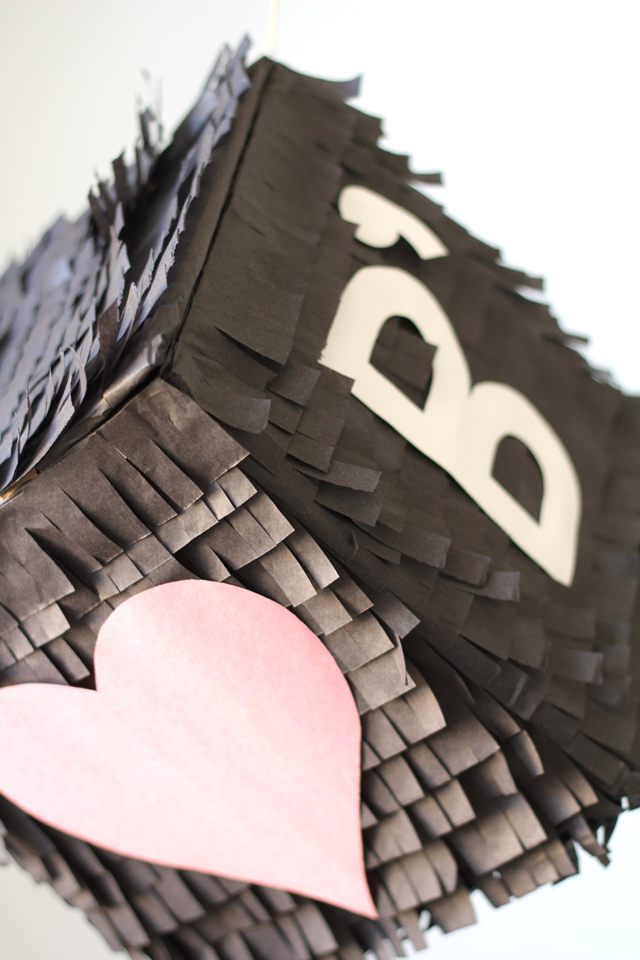
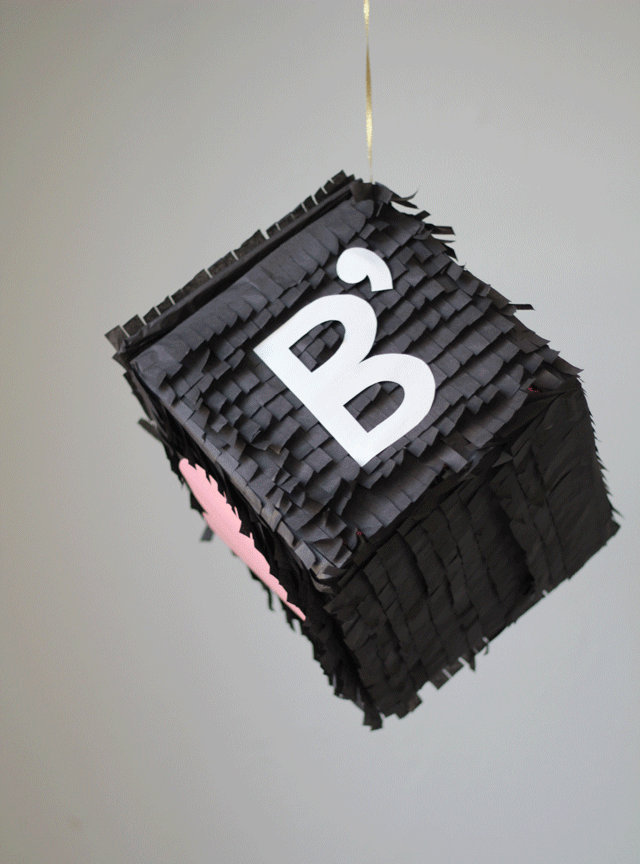
To celebrate the launch of Collections and Valentine’s Day, I made a fun Valentine’s day themed Bloglovin’ piñata!

It’s a bit more time consuming than my last DIY project, but it’s fun and there are endless ways to customize a piñata (Cinco de Mayo! Birthday parties! New Year’s Eve celebrations! Mini party favor piñatas!), so save this post to your DIY Collection and keep it in mind for a fun occasion!

What you’ll need:

  • Cardboard box
  • Tissue paper
  • Tape or paper glue
  • Construction paper
  • String for hanging
  • Scissors
  • Candy

How to make it:

  • Step 1. Cut strips of tissue paper the length of the piñata box and ~2 inches wide.
  • Step 2. Fringe one side of each strip of tissue paper by cutting slits about 3/4 of the width of the tissue paper.
    • (If you’re filling the piñata with candy you can either fill it now or wait until it’s complete–just be sure to make an opening in one corner of the box.)
  • Step 3. Attach fringe strips to one side of your piñata using tape or paper glue. *Start at the bottom and work your way up leaving roughly 1/2 – 1 inch between the last strip of tissue paper and the next.
  • Step 4. Cut off any excess tissue paper along the edges. There might be some overlapping, and I found that this actually looked better than the single layer fringe areas.
  • Step 5. Repeat this on each side of your piñata.
  • Step 6. Decorate your piñata however you’d like. For a Valentine’s Day themed Bloglovin’ Piñata, I made Bloglovin’s sleek new logo and cut out pink hearts.
  • Step 7. Pour in your candy.
  • Step 8. To secure a string to the box, I poked a hole in the side and tied a big knot at one end of the string and then thread the other end through the hole, leaving the knot on the inside of the box.
  • Step 9. Close the top of the box with tape and you’re done!


You can read all about Bloglovin’ here and sign up here, if you’re interested. There’s even an app for it, which was just featured as a Best New App in 15 countries by Apple!

CONGRATS, Bloglovin’ team!

Bloglovin'DIY

Related Posts

An Easy Flower-Arranging Tip That Anyone Can Try
How Cool Are These Chalk Mosaics?
Easy Construction Paper Easter Crafts for Kids
Eucalyptus Centerpiece with Upcycled Wine Bottles

Post navigation

Too good not to share: Saturday Night Live’s ‘Serial’ Parody
Have a great weekend

Say Something! Cancel reply

Your email address will not be published. Required fields are marked *

This site uses Akismet to reduce spam. Learn how your comment data is processed.

Kelley MacDonald

Kelley MacDonald

Welcome to my blog! Here you'll find stories about style, culture, design, travel, food, and motherhood. I'm thrilled to have you visit the site — thank you so much for reading!

Read more about Happily K.

Popular Posts

Style ➤ March 1, 2023

Flashback: Alloy Catalogs of the ’90s & ’00s

Here are signature looks from Alloy catalogs of the late '90s and early '00s, including links to similar products that you can buy now...

Read More
Design ➤ February 17, 2023

Eucalyptus Centerpiece with Upcycled Wine Bottles

Find our DIY eucalyptus centerpiece with upcycled wine bottles & weekend links...

Read More
Style ➤ February 13, 2020

An Ode to dELiA*s Catalogs

It’s the late-90s. Dial-up Internet is booming. The Motorola Bag Phone in my dad’s truck is the only mobile phone my family of four uses. And I’m somewhere flipping through a brand new dELiA’s catalog. ...

Read More
Style ➤ August 17, 2023

Do or Don’t: Mesh Flats

What are your thoughts on mesh flats, the It shoe of the summer?

Read More

Subscribe

We're launching a newsletter later this year! Sign up to be added to the list.

Disclosure — Some of our content contains affiliate links, and when you click one of the affiliate links and buy a product, we may earn a small commission. This doesn't affect cost on your end in any way, but it does support our small business and family. We feature only items we genuinely love and want to share with you. As always, thank you so much for reading and supporting us!

  • About
  • Contact
© 2025 | ALL MATERIALS COPYRIGHT HAPPILY K 2013-2024 | Site Designed by Little Theme Shop